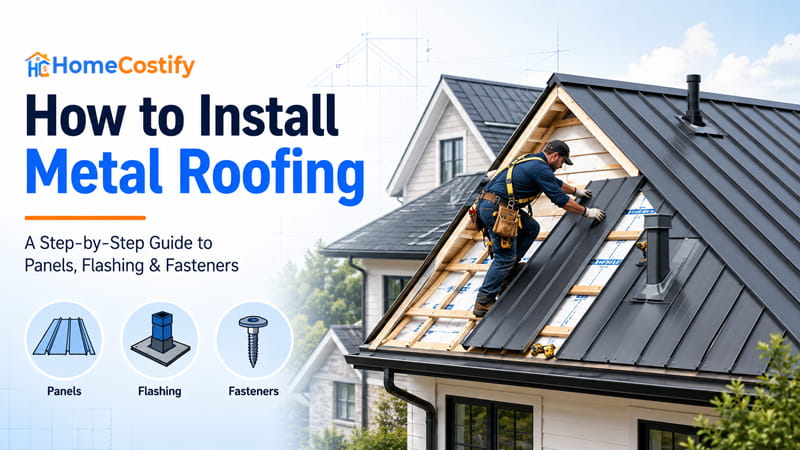
A metal roof installation covers more than laying panels over a roof and driving fasteners. The process starts with a sound surface, moves through layout and attachment, then ends with inspection. Learning how to install metal roofing means seeing those stages as connected work rather than isolated tasks.
The installation approach changes with the roofing system. Exposed-fastener, corrugated or ribbed, and standing-seam designs use different fastening, seam engagement, and detailing methods. Fastening and seaming requirements follow the panel profile. A technique suited to one system does not necessarily transfer directly to another.
Panel attachment alone does not determine whether the finished roof performs well. Alignment, fastening, transitions, and water movement interact across the assembly. An orderly-looking surface does not rule out a poorly coordinated detail or an unintended path for water.
Before You Install Metal Roofing
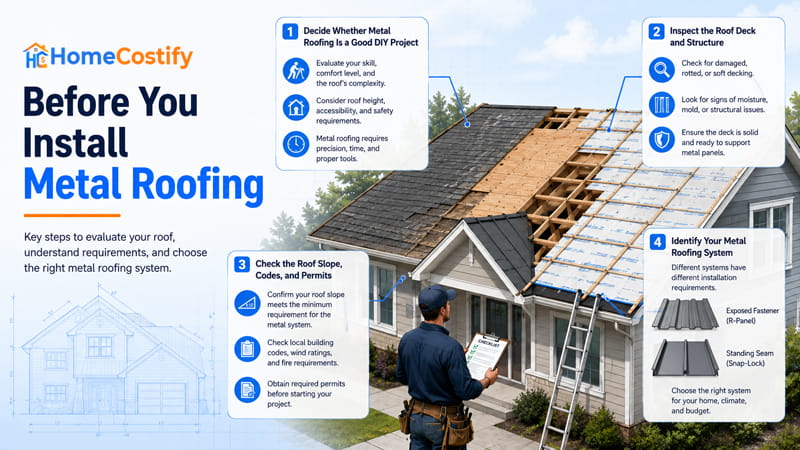
Project readiness starts with four questions: Is the work suitable for the homeowner? Is the supporting structure sound? What requirements apply? Which roofing system is being installed? Answering them in that order prevents unresolved conditions from reaching the installation stage.
Decide Whether Metal Roofing Is a Good DIY Project
A straightforward, accessible roof presents fewer practical demands than a steep or complex configuration. Height, geometry, access, panel length, and handling ability all affect the workload. Metal roofing cost belongs in the decision, although DIY does not automatically mean lower spending.
Metal roof lifespan offers a separate long-term value consideration. Limited experience or significant fall exposure may justify hiring help.
Inspect the Roof Deck and Structure
Rot, soft sheathing, sagging, damaged framing, and uneven areas can compromise the new covering. Loose or protruding fasteners can create additional irregularities across the surface.
Covering such defects leaves the underlying problem unresolved. When substantial correction is necessary, metal roofing repair cost becomes part of the project decision.
Check the Roof Slope, Codes, and Permits
Roof slope sets a boundary for suitable metal roofing installation methods. Local building codes and permits introduce another set of conditions. Wind exposure and other design factors belong in the requirements review.
Manufacturer specifications establish additional system-specific provisions. The selected method should satisfy all applicable conditions governing the metal roofing installation.
Identify Your Metal Roofing System
The panel profile establishes which system is being installed and influences its later fastening and seaming requirements. Exposed-fastener, corrugated or ribbed, and standing-seam designs are among the main metal roofing types.
Their installation details are not interchangeable. Color belongs to product selection, so metal roofing colors should not dictate the installation method. Likewise, the best metal roofing depends on the application rather than a universally superior system.
Tools and Materials for Metal Roofing

The work begins with tools and materials suited to the tasks ahead. Layout equipment establishes reference lines, cutting tools shape panels and trim, and fastening equipment supports attachment. Roofing materials complete the assembly those tasks are intended to build.
| Category | Examples | Why it matters |
|---|---|---|
| Layout tools | Tape measure, chalk line, framing/square tools | Keeps panel layout accurate |
| Cutting tools | Metal snips, appropriate saw/shears | Produces clean panel and trim cuts |
| Fastening tools | Screw gun/drill with controlled setting | Helps avoid damaged washers and overdriven screws |
| Roofing components | Panels, underlayment, flashing, trim, closures, ridge cap | Forms the complete roof assembly |
| Safety equipment | Fall protection, gloves, eye protection, proper footwear | Reduces common installation hazards |
Essential Tools
Measurement errors can shift the reference line and affect subsequent panel positioning. A tape measure, chalk line, and square tools establish the geometry needed for a reliable metal roofing installation guide.
Cutting and screw driving present separate execution demands. Metal snips or shears produce clean cuts, while a drill or screw gun with controlled settings supports installing metal roofing without unnecessary fastener damage.
Roofing Materials and Components
The visible covering is only one layer of the roof assembly. Metal roof panels work alongside underlayment, flashing, closures, trim, fasteners, sealants, and ridge components.
Compatibility deserves a separate check because component specifications follow the panel profile and manufacturer system. Closure shapes, fasteners, sealants, and ridge details may differ between systems. Material selection follows the applicable specifications.
How to Install Metal Roofing
A prepared roof moves through a defined sequence: substrate, perimeter, geometry, panels, water-management details, finishing, and inspection. Learning how to install metal roofing means keeping those stages in order rather than treating panel placement as the entire job.
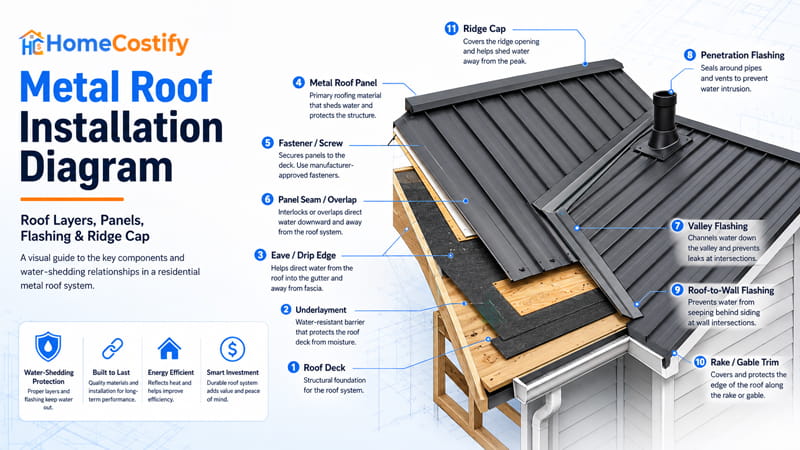
Metal roof installation diagram: showing the main roof layers, panels, flashing, fasteners, trim, and ridge components.
1. Prepare the Roof Surface
A sound substrate gives the new roof a stable base for the work that follows.
Remove or Evaluate the Existing Roofing
Uneven shingles can leave an inconsistent surface for the new covering. Hidden deterioration may exist beneath an existing roof. An overlay requires a condition assessment rather than an automatic assumption of suitability. If the existing assembly cannot support the new covering, removal becomes necessary, making metal roofing replacement cost part of the decision.
Inspect and Repair the Roof Deck
Soft sheathing, rot, sagging, and uneven areas indicate problems with the supporting deck. Protruding fasteners can create additional irregularities, while framing concerns may extend below the sheathing. Those defects need correction before the surface receives another layer. The resulting substrate should be clean, sound, and reasonably uniform.
Install the Underlayment
Underlayment adds secondary protection beneath the visible metal covering. Its arrangement needs to account for the eaves and other vulnerable areas within the roof detail.
According to the 2024 International Residential Code, underlayment is required for metal roof panels under R905.1.1. Structural metal panels that do not require a substrate or underlayment are specifically excepted. Applicable code provisions and manufacturer instructions govern the metal roofing installation.
2. Install the Eave and Edge Components
Runoff reaches the lower roof boundary, where its discharge needs a controlled path. The perimeter also establishes the edge condition for the panels that follow.
Install the Drip Edge or Eave Trim
Rainwater needs a defined route away from the exposed lower edge. Drip edge or eave trim directs discharge beyond the perimeter while protecting the vulnerable edge. Its placement creates the meeting point for the first panel and the eave detail.
Add Closure Components Where Required
Certain panel profiles leave shaped openings along the eave. A matching closure fills the space beneath the panel while limiting exposure to weather and insects. The profile determines the closure shape and its position within the edge detail.
Check the Eave Overhang
Measure panel projection along the lower perimeter before work continues. Check the projection before install metal roofing work moves beyond the starting area. Uneven spacing at the eave can carry into the finished panel line.
3. Establish the Panel Layout
A reliable layout gives the panel field a geometric framework for direction, spacing, and joint placement.
Measure and Mark the Roof
Roof dimensions, panel coverage, length, and intended eave projection shape the layout. Metal roofing dimensions inform panel quantity and potential waste. Record these measurements before determining panel direction and run spacing.
Create a Square Reference Line
A baseline establishes the initial geometry for the panel field. A perpendicular line can be verified with the 3-4-5 method when appropriate. Following the eave visually can carry an existing deviation into every subsequent row.
Choose the Starting Side
Panel direction varies with the profile, site conditions, and manufacturer instructions. Weather exposure can influence the preferred direction for some systems. Manufacturer guidance takes precedence when the system specifies a particular starting side.
Plan Panel Overlaps
Side laps define the joint formed by adjacent panels. End laps enter the plan when panel length requires multiple pieces along a run. Joint locations are determined during layout according to the applicable sequencing instructions.
4. Position the First Metal Roofing Panel
The first panel turns the established layout into a physical starting position. Its placement sets the geometry for the panels that come afterward.
Set the Panel at the Eave
The lower edge aligns with the intended eave projection. Its position corresponds with the perimeter condition established in the preceding section. This creates the initial relationship between the panel and roof edge.
Align It With the Reference Line
The first panel follows the established reference instead of relying on an apparently straight eave. Compare its position with the layout line before permanent attachment begins.
Check the Overhang
Inspect the panel projection for consistency before attachment. A discrepancy at the first panel can carry into the alignment of subsequent panels. Correct the position while adjustment remains straightforward.
Verify the Alignment Before Fastening
Compare the panel position at both ends against the established reference and eave projection. Make any correction while the panel is still movable. During installing metal roof work, controlling this initial discrepancy prevents it from carrying into the remaining panels.
5. Fasten the Metal Roofing Panels
Secure attachment involves more than driving screws through the panel. Fastener choice, entry location, washer seating, and spacing depend on the roofing system.
Select the Correct Fasteners
The roofing fastener must match the panel and supporting substrate. Corrosion resistance matters where dissimilar metals meet under environmental exposure. A screw suitable for one application may be unsuitable for another. Manufacturer-specified fasteners take priority over generic screw selection.
Place the Screws Correctly
Screw location depends on the panel profile and fastening method. For where to screw in metal roofing, manufacturer diagrams identify the intended attachment point. The screw must engage the supporting substrate at the location designated for the system.
Seat the Washers Properly
The sealing washer contacts the panel around the screw. Insufficient compression can leave an incomplete seal. Excessive force can deform the washer or panel. Angled fastening can interfere with proper seating. Compression requirements depend on the fastener and roofing system.
Follow the Manufacturer’s Fastening Pattern
Spacing and fastening density vary between roofing systems. Wind exposure and design conditions can affect the required pattern. The manufacturer’s fastening diagram defines the intended arrangement. Installer habit alone does not determine screw density. For how to install metal roofing screws, system documentation provides the applicable fastening pattern.
According to the Metal Construction Association, standing-seam clips accommodate thermal expansion and contraction. Clip selection must match the specific panel system and manufacturer requirements.
Fastener Check
- Confirm the screw reaches the supporting substrate designated for the system.
- Check that the washer contacts the panel evenly without visible crushing or distortion.
- A noticeably tilted screw head can indicate an attachment problem requiring correction.
- Replace damaged or compromised fasteners instead of leaving them in the finished roof.
6. Join and Overlap the Metal Roofing Panels
Adjacent panels form a continuous joint that guides water along the roof surface. Panel-to-panel connection differs from attachment to the substrate. Profile engagement, overlap, and specified sealing details determine how the joint performs.
Align the Side Laps
The profile determines how adjoining edges engage at the joint. Misalignment can leave an uneven lap and affect the finished appearance. A straight joint keeps the panel connection consistent along the run.
Create the Required Overlap
Overlap dimensions vary by panel profile and roofing system. End laps apply when panel length requires multiple sections along one run. Exposure conditions and manufacturer specifications influence the arrangement. Avoid applying one universal measurement to every metal roofing panels installation.
Use Sealant Where the System Requires It
Some panel joints incorporate sealant as part of the specified detail. Sealant compatibility depends on the adjoining materials and intended application. It cannot correct an improperly formed lap or replace the required joint geometry.
Check Each Joint
Inspect the completed joint for visible separation. Incomplete profile engagement, damaged edges, or inconsistent laps warrant correction while the joint is still accessible. This check covers the individual connection, not the completed roof.
7. Install Valley Flashing
A valley concentrates runoff from adjoining roof planes into a defined drainage channel. Keep the valley geometry unobstructed as surrounding panels approach the channel.
Prepare the Valley
The substrate must be sound, clean, and free from conditions that could disrupt the valley detail. Underlayment arrangement must accommodate the specified valley configuration. Establish the channel geometry before panel cutting begins.
Position the Valley Flashing
Runoff reaches the valley center without encountering an unintended obstruction. Proper orientation keeps the flashing aligned with the drainage route. Compatibility with the roofing system matters when selecting and positioning the component.
Fit the Panels Around the Valley
Panel edges require accurate cuts where they approach the channel. Consistent termination preserves the intended drainage area while limiting unnecessary openings. The cut line follows the specified valley detail without narrowing the water path.
Keep the Water-Shedding Path Clear
Debris, excessive sealant, displaced panel edges, or unintended openings can interfere with runoff. Check the channel as surrounding work progresses. Check the drainage route during panel work and remove anything that obstructs runoff.
8. Flash Roof Penetrations and Wall Transitions
Roof openings interrupt the drainage plane and require coordinated flashing around the affected area. Larger intersections involve several flashing planes that direct water around the obstruction.
Flash Pipes and Roof Vents
A pipe or vent boot must match the roofing system and panel opening. The opening follows the specified detail without creating an uncontrolled route for water. Proper integration directs runoff around the penetration and away from vulnerable areas.
Handle Skylights and Chimneys
Larger openings involve multiple flashing planes that manage water from different directions. Upper, lower, and side details interact with the surrounding panels. Their arrangement becomes critical when the opening interrupts several portions of the drainage path.
Flash Sidewalls and Headwalls
A vertical wall changes the way water reaches the roof plane. Sidewall and headwall conditions use different flashing directions, with counterflashing where applicable. The detail preserves drainage continuity as runoff approaches the wall.
Seal and Secure the Flashing
Mechanical attachment holds the flashing in position, while overlaps define the relationship between adjoining pieces. Compatible sealant can supplement the detail where specified. It should not compensate for poor flashing geometry or replace mechanical integration in metal roofing installation.
9. Install Roof Trim
The main panels leave the side edges exposed at the roof perimeter. Roof trim creates a defined termination while protecting exposed panel edges from weather.
Install Rake or Gable Trim
The side boundary receives straight trim aligned with the panel edge. A clean termination covers exposed metal and gives the roof perimeter a consistent finished line.
Overlap Trim Sections
Multiple pieces create a planned meeting point that maintains continuity along the edge. Overlap direction follows the specified detail, with movement allowance where the system requires it. Exposure and appearance influence the finished joint.
Finish Trim Joints
Trim joints use compatible sealant where specified and appropriate fasteners for the system. Remove loose debris from the completed detail instead of leaving it around the joint. A clean edge supports the intended result of roof metal installation.
10. Install the Ridge Cap
The roof apex receives a finished detail that protects the upper junction without obstructing designed ventilation. Ridge preparation, closures, cap coverage, and attachment work form the final upper-edge condition.
Prepare the Ridge
A straight ridge line provides the cap’s alignment reference. Where the system requires it, the ridge opening aligns with the intended ventilation path. That opening corresponds with the ventilation design specified for the roof.
Install Closure Strips
Closure pieces follow the panel profile beneath or around the cap. Their shaped fit limits exposed voids while providing insect and weather protection. The appropriate closure depends on the specific roofing system and its ridge detail.
Position the Ridge Cap
The cap sits centrally over the roof apex with consistent coverage on both sides. Lap direction follows the specified system detail, not a universal arrangement. Uniform overlap keeps the upper edge visually consistent along the ridge.
Fasten and Seal the Cap
System-specific attachment secures the cap without restricting its intended function. Compatible sealant can supplement the detail where specified. Vented designs retain open ventilation paths, so sealing cannot close openings intentionally left functional by the system.
11. Inspect the Finished Roof
Panel lines and attachment points provide the first visual check of the completed roof. Consistent alignment carries from the initial panel through the remaining field. For metal roofing installation, fasteners appear properly seated without obvious missing or damaged attachments.
Water-management details receive a separate inspection pass. Check the laps for proper engagement and inspect valley channels for obstructions. Penetration flashing, ridge caps, and trim sit in their intended positions. Visible openings or damaged flashing warrant attention.
Remove loose metal shavings and debris from the finished surface. Look for damaged panels or trim around completed work. Loose material and unfinished details can reveal small defects missed during the main installation.
Metal Roofing Safety Practices
Metal roofing work combines roof-edge exposure, sharp materials, long panels, hand tools, weather changes, and nearby electrical hazards. Each condition introduces a different risk during active work.
- Use appropriate fall-protection equipment for the roof and work conditions.
- Avoid wet or high-wind conditions when panels become difficult to control or footing becomes less reliable.
- Account for sharp edges and the long, flexible shape of metal panels during carrying, cutting, and positioning.
- Maintain appropriate clearance from electrical hazards around the work area.
- Wear suitable eye, hand, and foot protection for cutting, fastening, and walking on the roof.
Wind can turn a long panel into a difficult load during elevated handling. Sharp edges add exposure during carrying and cutting. For install metal roofing, controlled handling matters whenever panels move at roof level.
A roof edge leaves little room for a slip or loss of balance. Wet surfaces reduce footing, while wind changes material control. Weather conditions can shift during the same roofing session. These changing conditions belong in any metal roof installation guide.
Common Metal Roofing Installation Mistakes
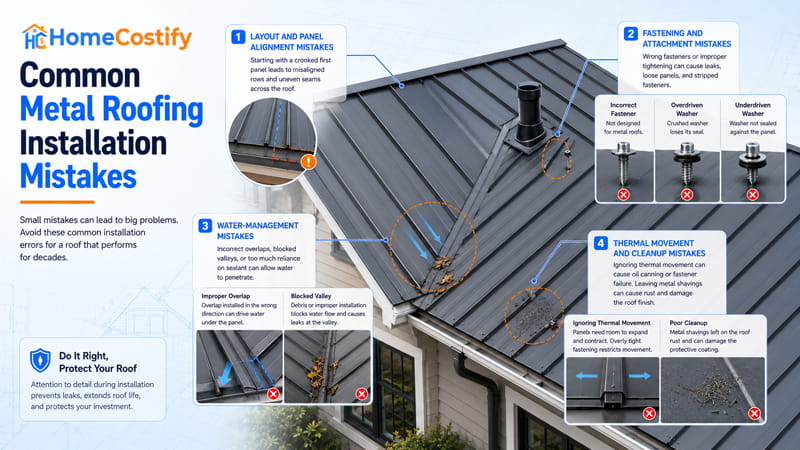
Installation mistakes usually involve geometry, attachment, water movement, or overlooked system details. Each failure creates a different consequence for the finished roof.
Layout and Panel Alignment Mistakes
An out-of-line first panel can introduce inconsistent lines across the roof. During metal roof installation, that initial error becomes harder to correct as more panels enter the field. Early alignment checks limit error propagation through the panel run.
Fastening and Attachment Mistakes
An incompatible fastener introduces attachment or corrosion problems when its materials do not suit the application. During install metal roofing, excessive driving force deforms a washer or panel. Insufficient driving force compromises the seal. Fastener choice and driving quality therefore affect attachment strength and weather resistance.
Water-Management Mistakes
An insufficient or poorly formed overlap leaves a vulnerable joint within the water-shedding surface. Water then gains a path outside the intended drainage route. Blocked valleys create another failure point when debris restricts runoff. Excessive sealant can interfere with engineered details when applied without regard to joint or drainage geometry.
Thermal Movement and Cleanup Mistakes
Some standing-seam systems accommodate thermal movement through system-specific clips or attachment details. Treating every roofing system identically conflicts with that design. Where movement accommodation forms part of the system, its specified attachment approach controls.
Cutting produces metal shavings that collect around completed work. Remove debris before completion to prevent avoidable problems after installation. This final cleanup keeps the finished area free from loose material and overlooked residue.
Can You Install Metal Roofing Over Shingles?
A metal roof over existing shingles depends on roof condition, applicable code, and the selected roofing system. An overlay suits some roofs, while other conditions make removal necessary.
The existing shingles establish the surface condition for an overlay decision. Excessive deterioration, uneven areas, or damaged sections can affect panel support and finished appearance. Hidden moisture or underlying defects deserve evaluation before metal roofing installation proceeds. Covering visible damage does not resolve the underlying problem.
Local building requirements determine whether reroofing over shingles is permitted. Manufacturer instructions add system-specific requirements for acceptable substrates, underlayment, and installation conditions.
Roof slope and existing construction can further affect eligibility. For install metal roof work, these requirements must align before the overlay approach is selected.
Significant unevenness creates an inconsistent base for the new roof system. Moisture or structural problems introduce a separate concern because the existing roof already contains unresolved defects.
Removal may become necessary when the existing construction cannot support the proposed system. The decision rests on the actual roof condition and applicable requirements.
Final Takeaway
A finished metal roof performs as a connected system, not as isolated components. The prepared base, geometry, attachment, panel joints, drainage details, and perimeter work all influence the finished result. Their interaction matters more than any single installation step.
Completion requires verification against the requirements governing the selected system. Panel dimensions, fastener patterns, slope conditions, flashing details, and other provisions belong to the applicable manufacturer instructions and code.
How to install a metal roof therefore begins with system-specific requirements and ends with verification that the completed work satisfies them.
FAQs About How to Install a Metal Roof
What are some common mistakes people make when installing a metal roof?
Common failures include poor alignment, incorrect fastening, inadequate overlap, and poorly integrated flashing. Each can compromise the finished roof in a different way.
What is the correct way to screw down metal roofing?
Use the fastener, location, spacing, and washer seating specified for the particular panel system. Manufacturer instructions control when these details vary by profile.
What is the best way to overlap metal roofing panels?
Panel overlap follows the profile, manufacturer specification, and applicable weather or design requirements. The required arrangement varies between roofing systems and panel configurations.
Do you put sealant between metal roof panels?
Some panel systems specify seam sealant, while others rely on their designed mechanical joint. Sealant supplements the detail and does not replace proper panel engagement.
Which side of metal roofing do you start with?
The starting side depends on panel profile, roof layout, site conditions, and manufacturer instructions. Proper planning is part of installing metal roofing without creating a universal left-or-right rule.