A cold-weather heating bill can rise quickly during long heating cycles. The thermostat controls the indoor target that the heating equipment works to maintain. The best temperature to set thermostat in winter to save money depends on the household’s actual need for warmth. A lower target can reduce heating demand, but comfort still sets a practical limit.
Lowering the thermostat may reduce the work required to heat the house. The trade-off becomes noticeable once cooler rooms start affecting daily use of the space.
households can live comfortably with less warmth, while others prefer a higher indoor temperature. The decision comes down to finding a level that does not make ordinary time at home unpleasant.
The goal is a temperature the household can keep without wasting heat or sacrificing reasonable comfort. That point will differ from one home to another. A thermostat setting in winter should leave enough room for normal daily life while avoiding heating the house beyond what the occupants require.
Best Temperature to Set Thermostat in Winter to Save Money
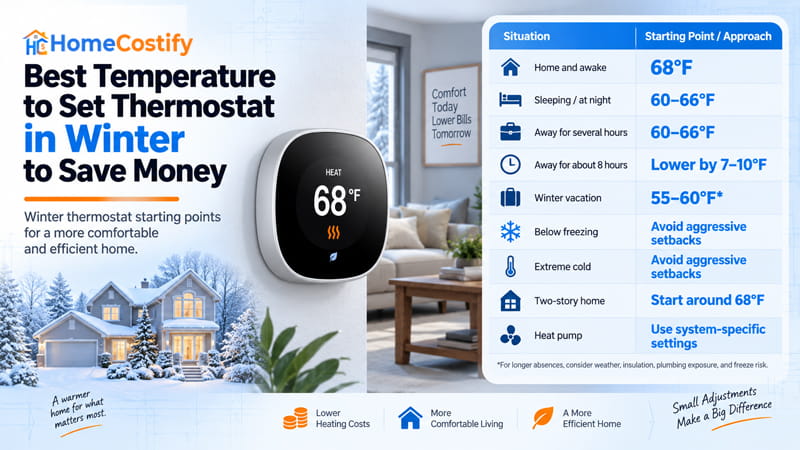
There is no single indoor temperature for every winter situation. The table below gives practical starting values for common household conditions, with each one tied to a specific use case.
| Situation | Starting Point | Decision Context |
|---|---|---|
| Home and awake | 68°F | Practical comfort starting point |
| Sleeping / at night | 60–66°F | Lower if comfortable for sleep |
| Away for several hours | 60–66°F | Use a setback rather than maintaining daytime comfort |
| Away for about 8 hours | 7–10°F lower | Common setback range for a substantial daily absence |
| Winter vacation | 55–60°F* | Balance savings with freeze protection |
| Below freezing outside | Avoid aggressive setbacks | Keep the home at a stable, protective temperature |
| Extreme cold | Avoid aggressive setbacks | Prioritize stable operation and home protection |
| Two-story house | Start around 68°F | Adjust according to thermostat and zoning arrangement |
| Heat pump | System-specific | Avoid assuming a large setback is appropriate |
*Longer absences require consideration of weather, insulation, plumbing exposure, and freeze risk.
The numbers above answer the immediate question, but they are not meant to dictate one setting for every home. Room use, occupancy, and the way the house is heated can change the choice.
For a home that is being used normally, 68°F provides the main starting temperature in this guide. That gives homeowners a clear place to begin as they set thermostat in winter during regular waking hours. Other parts of the day can follow separate settings without changing that starting point.
A change for a particular circumstance does not replace the temperature used under normal conditions. That adjustment applies only to its specific situation, leaving the rest of the day unchanged. A thermostat setting for winter can shift for a specific need without creating a new default for the home.
Why 68°F Is a Good Starting Point in Winter
A winter thermostat reference needs to balance heating needs with everyday comfort. Thermostat setting recommendations give a practical temperature to work from without treating one number as suitable for every home.
How Indoor and Outdoor Temperatures Affect Heat Loss
A heated house is warmer inside than the winter air outside, so heat moves outward through the building envelope. The larger the difference between indoor and outdoor temperatures, the faster heat tends to leave the house. A thermostat setting in winter changes the indoor side of that difference.
Lowering the indoor temperature narrows the gap between inside and outside. Heat still leaves the house, but there is less heat for the heating system to replace. The house itself also matters; construction, weather exposure, and other characteristics affect the rate of heat loss.
Is 68°F Really the Best Winter Thermostat Setting?
Sixty-eight degrees is not automatically the right temperature for every household. You can set the thermostat in winter below 68°F if the rooms still feel comfortable. Recommended thermostat settings need to account for individual comfort at the same indoor temperature.
For some people, 65°F, 66°F, or 67°F may feel comfortable during normal time at home. Clothing, activity, the room being used, and personal preference all affect that experience. A lower setting is not necessarily better if the cooler room becomes uncomfortable.
The cheapest way to heat a house depends on more than the thermostat. Heating equipment, fuel, and the characteristics of the house also affect the cost. The temperature to set thermostat in summer is a separate seasonal question and does not change the winter choice.
For winter, 68°F is a sensible temperature to try first. If a lower temperature feels comfortable, there is no need to keep the thermostat at 68°F simply because it is the reference used here.
Lower the Thermostat When You Sleep or Leave
A home serves different purposes across the day. Its heating needs change with occupancy, so a winter thermostat setting can follow periods of active room use.
Set the Thermostat for Sleeping
Nighttime creates a quieter period with fewer rooms in active use. A thermostat setting in winter at night can fall below the daytime level for people who prefer a cooler bedroom.
Around 60–66°F gives a reasonable range for overnight use. The upper end keeps the room warmer, while the lower end creates a cooler sleeping environment. The bedroom itself can influence which point works better through the night.
Set the Thermostat When You’re Away
An empty house creates a longer period without the usual daytime activity. You can set thermostat in winter for an absence instead of holding the daytime temperature until everyone returns.
Duration separates a brief trip from a full workday. A quick errand may last only an hour or two, leaving little time for a substantial change. An absence of roughly eight hours creates a longer window for a setback.
The setting used during a workday absence can therefore be lower for that period. The home’s actual situation should guide the level chosen for the setback.
Set the Thermostat for a Winter Vacation
Several days without occupants create a much longer heating interval. Setting the thermostat in winter on vacation around 55–60°F keeps the house at a reduced temperature during the trip.
The priority also shifts toward protecting the property. Winter weather, insulation, and exposed plumbing can raise the risk of frozen pipes. A vacation setting should account for those conditions rather than treating the lowest possible temperature as the objective.
The length of the absence therefore changes the decision: overnight adjustments focus on sleeping, workday setbacks follow the daily schedule, and vacations require protection throughout the empty period.
Winter Thermostat Settings for a Two-Story House
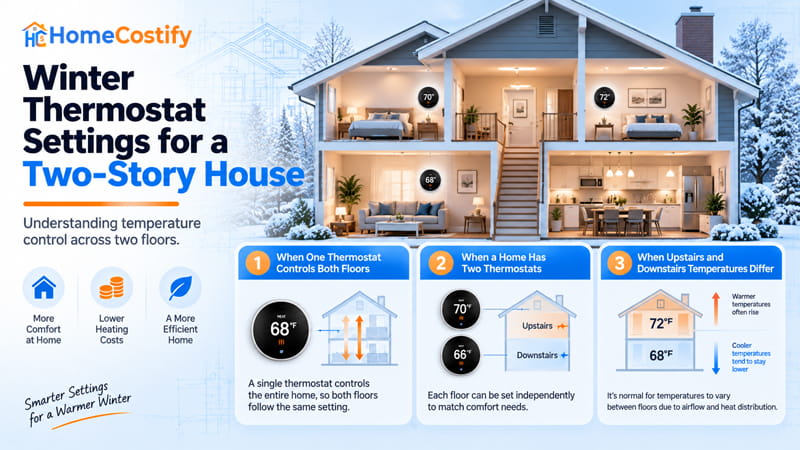
Temperature inside a two-story house can vary between floors. Winter thermostat settings still depend on where the thermostat takes its measurement. The displayed temperature applies most directly to the area around that control.
When One Thermostat Controls Both Floors
A thermostat measures the air around its installed location. With thermostat settings for winter, that measurement guides the heating response for the house. The floor containing the thermostat has the strongest influence on the control. The other floor can run warmer or cooler because its temperature is measured elsewhere.
Thermostat location matters in a two-story house. A lower-level thermostat reports the air around that floor, while rooms above can reach another temperature. An upstairs thermostat works from the same principle, using its own surrounding air.
When a Home Has Two Thermostats
Separate thermostats give each floor its own temperature measurement. A thermostat setting for winter can then follow the area controlled by each unit. Each level has its own control point, allowing the floors to respond separately.
The settings can still follow the way each floor is used. Separate controls allow each level to receive its own adjustment instead of applying one target across the entire house.
When Upstairs and Downstairs Temperatures Differ
A warmer upper floor and cooler lower floor are common patterns in a two-story house. The thermostat responds to its installed location, so the displayed temperature represents that part of the home.
A floor-to-floor temperature difference alone is not a reason for a large adjustment. Check the thermostat’s measurement area before changing the temperature significantly.
Adjust Winter Settings for Outdoor Conditions
Outdoor weather affects the depth of a possible setback. A thermostat setting for winter needs to account for outdoor temperature and the duration of the cold spell.
- Mild winter weather: Regular setbacks fit well with moderate outdoor temperatures. An empty house can sit at a lower temperature for several hours without the same concern found during severe cold.
- Below freezing: The decision to set thermostat in winter below freezing calls for caution. Areas near exterior walls, windows, or exposed plumbing tend to lose heat sooner. A modest setback keeps those areas from getting excessively cold.
- Extreme cold: Severe weather changes the priority. A thermostat setting during extreme cold should keep the house at a steady temperature instead of creating a large indoor drop. A winter storm can make uninterrupted heating especially important during prolonged freezing weather.
Greater outdoor cold makes aggressive setbacks less attractive. Stable indoor temperatures take precedence during prolonged periods of severe weather.
How Much Can a Thermostat Setback Save?
Changing the thermostat can affect heating costs. The financial impact depends on the amount of heat used to maintain the indoor temperature and the resulting change in energy use.
What the 7–10°F Guideline Means
According to the U.S. Department of Energy, lowering your thermostat by 7°F to 10°F for about eight hours a day—such as while you’re asleep or away—can save as much as 10% a year on heating costs. The reason is straightforward: a cooler indoor temperature slows the rate at which your home loses heat during the setback period.
The size of the setback matters, but so does the time spent at the lower temperature. If you set your thermostat in winter during sleep or an absence, the house spends those hours at a reduced indoor temperature.
A longer setback keeps the lower temperature in place for more hours. That can help you save on your heating bill, but the DOE figure is an upper benchmark, not a guaranteed result for every household.
Why Your Actual Savings Can Be Different
Savings estimates work as benchmarks, not personal promises. Thermostat settings for winter produce results that depend on the house and its occupants. A benchmark provides a comparison point, not a fixed outcome.
The local climate affects the heating load of a house. Occupancy changes the length of the setback period. Comfort preferences can limit the depth of the temperature drop. HVAC equipment also affects the final heating cost.
For electric resistance heating, those changes can save on your electric bill. A household using another fuel tracks that expense through its primary heating source.
A winter thermostat setting still needs household context. ENERGY STAR reports that certified smart thermostats save about 8% of heating and cooling bills on average, or roughly $50 per year, but your actual savings can vary with your climate, occupancy, comfort preferences, and HVAC equipment.
In other words, a thermostat setting that saves one household money may not produce the same result in another home.
Your Heating System Can Change the Best Winter Setting
Heating equipment responds to thermostat changes according to its method of producing and restoring indoor heat. The thermostat setting in winter also interacts with that equipment response.
Furnace Heating
A thermostat calls for heat after the indoor temperature falls below its target. The furnace then runs through a heating cycle to raise the temperature.
With thermostat setting recommendations, a scheduled setback creates a lower target for a defined period. Once that period ends, the furnace receives a new call for heat.
The resulting recovery follows the same basic cycle. The furnace runs until the indoor temperature reaches the new target. This provides a straightforward reference for understanding equipment-specific thermostat behavior.
Heat Pump Heating
Heat pumps can respond differently to large thermostat changes. A heat pump thermostat setting winter strategy therefore deserves attention to the recovery period.
A large setback creates a larger temperature gap to overcome after the target rises. The system then has to restore indoor heat while operating according to its heating capacity and controls.
Auxiliary heat can enter that recovery process on systems equipped for it. Electric resistance heat provides supplemental heating when the system calls for it. That response is not automatic after every setback. Winter thermostat settings should follow the controls and operating guidance for the specific heat-pump system.
Other Heating Systems
Boilers, radiant heating, and electric resistance systems have their own thermal response. Water, heated surfaces, and resistance elements transfer heat through different mechanisms.
With setting the thermostat in winter, thermal mass can influence the speed of a space’s response after a setback. A boiler or radiant system can therefore recover at a different pace from a conventional furnace. The practical effect depends on the system’s method of delivering and releasing heat.
How to Build a Winter Thermostat Schedule
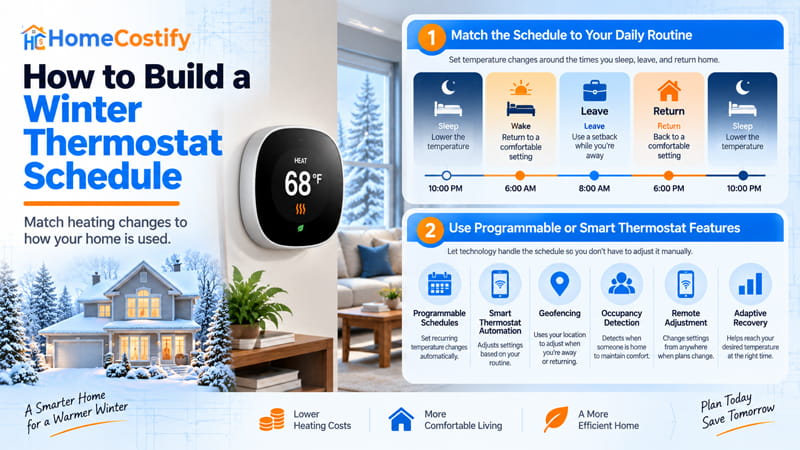
A consistent routine makes thermostat changes easier to manage from day to day. A thermostat schedule for winter ties those changes to the household’s actual timing.
Match the Schedule to Your Daily Routine
Start with the household’s recurring occupancy pattern. A winter thermostat schedule works best around the household’s established daily rhythm.
Mark wake-up, departure, return, and bedtime as the day’s main transitions. These points provide natural opportunities for changing the thermostat.
The occupied period should begin with the indoor temperature already at the level needed for that part of the day. The schedule needs to complete the change before that period starts.
After departure, the unoccupied period provides the scheduled setback window. Its timing should follow the actual departure instead of an assumed clock time.
The return transition deserves the same attention. The temperature change should occur early enough for the house to reach the intended level before it is needed.
Use Programmable or Smart Thermostat Features
A programmable thermostat can execute recurring changes without requiring manual adjustments each day. With smart thermostat settings for winter, scheduling becomes easier to manage around changing routines.
Smart thermostats add flexibility for households whose normal timetable changes. Geofencing can use location data to adjust operation around arrival and departure.
Occupancy detection offers another approach by responding to detected presence. Remote control lets you adjust the schedule from elsewhere after plans change unexpectedly.
Adaptive recovery coordinates the timing of a temperature change with an expected occupied period. These features reduce repeated manual work while keeping schedule timing tied to household activity.
How to Find the Lowest Comfortable Winter Setting for Your Home
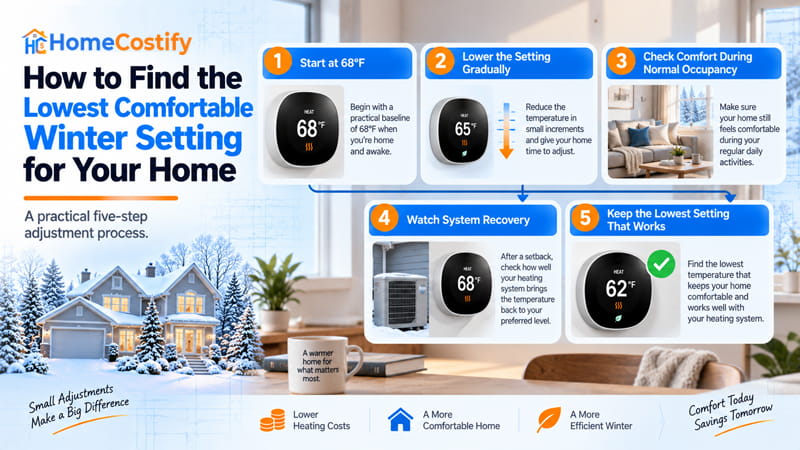
A general thermostat recommendation provides a starting reference, but the workable target belongs to the household. Your winter adjustment can be refined through controlled changes and observation.
Step 1 — Start at 68°F
Begin with 68°F as the consistent reference point. Using the same baseline makes later observations easier to compare.
Step 2 — Lower the Setting Gradually
Make small adjustments instead of changing the thermostat by a large amount at once. If you set thermostat in winter gradually, each change gives you a clearer basis for judging the result.
Step 3 — Check Comfort During Normal Occupancy
Use ordinary time at home as the test. Pay attention to the rooms during normal activity, including the parts of the house that receive regular use.
The lower setting works only if the household remains reasonably comfortable during those occupied periods.
Step 4 — Watch System Recovery
A lower setting can feel fine during occupancy but create a difficult recovery period later. Watch the time required for the house to return to the desired comfort level after the target rises.
If recovery takes too long, the setting may not work well for the household’s routine.
Step 5 — Keep the Lowest Setting That Works
The final target should meet both tests: comfortable occupancy and workable recovery. A winter thermostat setting that passes both checks becomes the household’s practical target.
Final Takeaway
No single number works equally well for every house. The best temperature to set thermostat in winter to save money starts with 68°F, then shifts according to comfort, occupancy, equipment, and weather. The resulting winter thermostat setting should fit the way the house actually operates.
Lower the target only as far as the household can comfortably live with it. As you set thermostat in winter, unnecessary heating should fall without creating an impractical indoor environment. The lowest comfortable setting is the final benchmark.
FAQs About Best Temperature to Set Thermostat in Winter to Save Money
What is the most efficient thermostat setting for winter?
For a home that is occupied and awake, 68°F is a practical starting point. Comfort, occupancy, and the heating system can shift the most efficient choice.
Is it cheaper to leave your thermostat at one temperature?
Not automatically. A constant temperature can cost more than scheduled setbacks during predictable periods of sleep or absence.
How much can I save by lowering my thermostat?
The DOE says a 7–10°F reduction for about eight hours daily can save as much as 10% annually. Actual savings vary.
How many degrees should I lower my thermostat at night?
A 7–10°F setback is a common guideline, not a required nighttime temperature. Comfort and heating behavior guide the practical choice.
Is 22 degrees hot at night?
22°C is about 72°F, which is relatively warm for sleeping compared with the cooler nighttime settings discussed above.