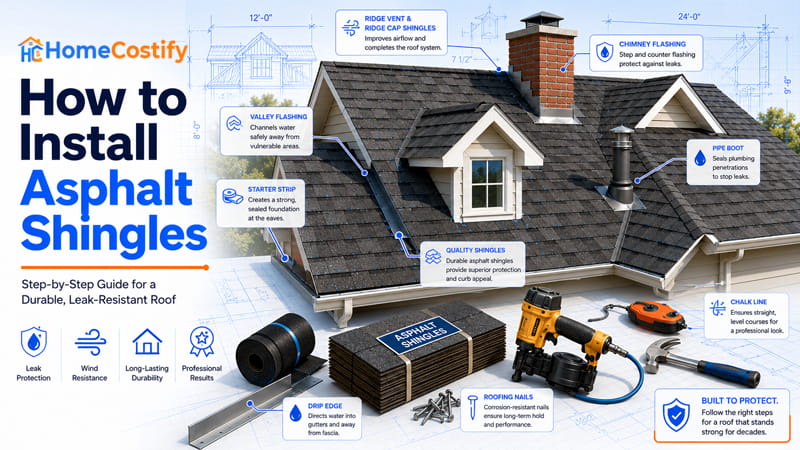
Rain never follows a perfectly straight path across an asphalt roof. Roof pitch, wind direction, and overlapping shingle courses redirect water until it reaches the eaves. How to install asphalt shingles starts with understanding how every roofing layer controls that movement.
A watertight roof relies on proper layer placement from the roof deck upward. Water-resistant barriers, flashing, ridge components, and shingles each intercept moisture at different points. One missing component can leave concealed pathways into the wood structure below.
Every overlap forms part of a continuous water-shedding assembly. Asphalt shingles installation succeeds when rain flows outward instead of finding openings beneath finished roofing materials.
Before You Start Installing Asphalt Shingles
Preparation shapes the quality of asphalt shingles installation long before the first course reaches the roof. Site conditions, local requirements, weather, and project planning deserve careful review first. Correct preparation reduces avoidable delays and lowers unnecessary risk.
Is Asphalt Shingle Installation Right for a DIY Project?
Difficulty depends on roof layout as much as construction experience. A low-pitch gable roof presents a very different challenge than one containing valleys, hips, dormers, or multiple chimneys. Installing asphalt shingles on a basic design suits confident DIYers who already understand safe ladder use and elevated work.
A steep roof slope increases fatigue and demands steady footing from the first hour on the roof. Reliable fall protection becomes essential as elevation and pitch increase. Complex roof geometry adds waterproofing transitions that demand greater precision, making professional roofers a practical choice for intricate designs.
Check Local Building Codes and Manufacturer Instructions
Local building codes define minimum technical requirements for residential roofing, including approved roof slope ranges for asphalt shingles. Requirements vary across cities and counties, making verification an early planning priority. Every asphalt shingles installation should satisfy local regulations before materials arrive.
Codes establish a baseline. Manufacturer instructions frequently include additional product requirements tied to warranty coverage, product testing, and long-term service life. Following both sets of requirements avoids preventable compliance issues.
Choose the Right Weather Conditions
Weather influences material behavior throughout a roofing project. Installing asphalt shingles during dry, mild temperatures gives each sealant strip suitable conditions for bonding after sunlight warms the surface. A clean roof surface improves footing and reduces unnecessary slipping hazards.
| Weather Condition | Installation Suitability |
|---|---|
| Dry, Mild Weather | Recommended |
| Light Rain | Not Recommended |
| Strong Wind | Unsafe |
| Freezing Conditions | Requires Special Procedures |
Temperature, moisture, and wind each affect roofing in different ways. Cold weather slows sealant activation. Rain introduces moisture where dry materials belong. Strong wind reduces stability for anyone moving across exposed roof sections.
Gather the Required Tools and Materials
Organized preparation prevents unnecessary interruptions once roofing starts. Safety equipment, measuring tools, cutting tools, and roofing materials each support a different part of the project. Selecting products with correct asphalt shingles dimensions prevents fit and layout problems later.
Roofing nails, starter strip, drip edge, chalk line, roofing harness, underlayment, and ice and water shield should all remain available before installation day. Searching for missing components after work has started wastes time and interrupts progress.
| Category | Examples |
|---|---|
| Safety Equipment | Harness, roof jack, ladder |
| Roofing Tools | Hammer, nailer, utility knife, chalk line |
| Roofing Materials | Shingles, underlayment, drip edge, starter strip, flashing |
Complete materials alone do not guarantee quality. Accurate measuring tools, dependable safety equipment, and compatible roofing components contribute just as much to a smooth asphalt shingles installation as the shingles themselves.
Prepare the Roof for Asphalt Shingle Installation
Before installing asphalt shingles, roof preparation starts with a solid structural base. Flat, clean, and stable surfaces support every roofing component added later. Small defects hidden at this stage can shorten roof service life long after construction finishes.
Remove Existing Roofing Materials
Old roofing layers do not always reveal what lies beneath. Removing existing shingles exposes the roof deck, making hidden damage, trapped moisture, warped panels, or structural movement visible during inspection. Surface appearance alone rarely reflects deck condition.
Building codes in some jurisdictions permit reroofing without complete tear-off. Anyone researching how to install asphalt shingles over old asphalt shingles should first confirm structural capacity, local requirements, and roof condition. Extra roofing layers increase dead load and conceal problems that deserve correction before another covering goes in place.
Loose debris, roofing granules, and remaining fasteners should leave the roof surface clean before inspection continues. A clear deck reveals defects that would otherwise stay hidden beneath old roofing materials.
Inspect the Roof Deck
Inspection begins with every exposed section of the roof deck. Soft spots, rot, delamination, moisture damage, and loose roof sheathing indicate areas requiring attention before new roofing materials arrive. Small defects spread across wider sections when structural weakness goes unnoticed.
Deck condition influences every stage of asphalt shingles installation. Uneven panels create high and low points across finished roofing, affecting alignment and long-term durability. Solid structural support gives roofing materials a stable foundation across every roof section.
Industry guidance from NRCA treats roof assemblies as integrated systems. Deck condition influences how upper roofing components perform throughout their service life. Careful inspection confirms that supporting layers can carry roofing materials without hidden structural concerns.
Repair Damaged Roof Sheathing
Minor surface damage sometimes responds to localized repair. Widespread decay, swollen wood, structural movement, or weakened decking panels usually require full asphalt shingles replacement. Material strength matters as much as surface appearance.
Sound roof sheathing supports uniform shingle alignment across every section. Uneven repairs create raised edges and shallow depressions that remain visible after installing asphalt shingles. A flat roof deck gives every roofing course consistent support from edge to edge.
Install the Drip Edge
Water naturally follows roof edges after crossing finished roofing. A properly positioned drip edge directs water runoff away from exposed wood, reducing repeated moisture contact along vulnerable edges. Metal edging serves both protective and drainage functions.
| Roof Edge | Purpose of Drip Edge |
|---|---|
| Eaves | Directs water into the gutter while protecting the roof deck edge. |
| Rake | Shields exposed roof edges from wind-driven rain and helps secure the shingle perimeter. |
Placement varies between eaves and rake edge because each edge faces different water movement and wind exposure. Positioning reflects drainage patterns across roof geometry, not appearance alone.
Correct edge roof protection supports durable asphalt shingles installation from the first day of service. Water reaching exposed deck edges over repeated wet seasons gradually weakens wood fibers. Properly placed drip edge components interrupt that cycle and preserve vulnerable roof edges throughout normal weather exposure.
Install the Roof Protection System
Rainwater does not always stop at the outer roofing surface. Hidden protective layers reduce leak risk after water passes beneath exterior roofing materials. Each layer follows a planned sequence so moisture continues moving toward roof edges instead of wood roof framing.
Install Ice and Water Shield
Roof edges and inside corners collect water under different conditions than open roof sections. Melting snow, wind-driven rain, and slow drainage place extra stress on those locations. A self-sealing waterproof membrane reinforces vulnerable areas where moisture spends longer periods.
An ice and water shield commonly covers eaves, roof valleys, roof penetrations, and other locations identified by local requirements or roof design. Coverage varies with climate, roof geometry, and regional building standards. Warm regions sometimes require smaller protected areas than cold climates exposed to ice dams.
Successful asphalt shingles installation depends on directing water away from structural wood before moisture reaches hidden framing. Extra membrane protection limits water intrusion where runoff naturally concentrates or backs up.
Industry guidance published by NRCA recognizes that certain roof areas need additional protection because water and ice accumulate there under specific weather conditions. Local building codes can establish similar requirements for vulnerable roof sections.
Completing asphalt shingles installation without reinforced protection in critical locations leaves roof drainage dependent on a single exterior covering. Extra membrane creates another barrier where water pressure and prolonged moisture exposure place greater demands on roofing assemblies.
Install the Underlayment
A roof covering sheds most rainwater, yet small amounts of moisture can still move beneath exterior materials. Underlayment forms a secondary water barrier across the roof deck, separating structural wood from incidental moisture during normal service life.
Two products dominate residential roofing projects. Roofing felt has served builders for decades because of its familiar performance and economical cost. Synthetic underlayment uses engineered materials with higher tear resistance and lower weight, making handling easier across large roof areas.
| Underlayment Type | Typical Characteristics |
|---|---|
| Asphalt Felt | Traditional, economical |
| Synthetic Underlayment | Lighter, stronger, more tear resistant |
Selection depends on project priorities as much as material type. Exposure during construction, local climate, durability expectations, and handling preferences all influence product choice.
Each sheet installs with intentional overlap so water continues flowing downslope without reaching exposed wood. Gaps interrupt drainage paths and reduce protection across lower roofing layers.
Successful installing asphalt shingles starts with continuous coverage across every roof section, not isolated pieces placed wherever space remains. Consistent overlap creates uninterrupted protection beneath future roofing courses.
A properly installed secondary water barrier supports long-term roof performance even after years of seasonal expansion, contraction, wind, and rain. Completing this layer carefully gives installing asphalt shingles a dependable foundation without relying solely on exterior roofing materials.
Mark the Roof With Chalk Lines
Straight shingle courses begin with accurate reference lines, not visual estimation. A chalk line establishes consistent layout across broad roof sections, preventing gradual alignment errors that become noticeable near ridges or roof edges.
Small deviations grow wider with every additional course. Reference lines maintain uniform shingle exposure, producing balanced roof appearance and steady water flow across finished surfaces. Careful layout planning strengthens asphalt shingles installation without changing roofing materials or construction methods.
Visible guide lines reduce repeated measuring after each course. Consistent spacing from one side of the roof to the other limits cumulative errors that become difficult to correct once upper rows cover lower sections.
Perform a Final Pre-Installation Check
Every protective layer should receive one final review before installing asphalt shingles. Confirm that the roof deck stays solid, membrane sections lie flat, underlayment fully covers intended areas, drip edge sits securely, and each chalk line remains visible across planned roofing courses.
| Inspection Item | Ready for Installation? |
|---|---|
| Roof Deck | ✓ |
| Drip Edge | ✓ |
| Ice & Water Shield | ✓ |
| Underlayment | ✓ |
| Chalk Layout | ✓ |
Inspection at this point catches missing sections, lifted edges, damaged materials, or layout irregularities without disturbing completed roofing layers. Corrections require far less effort now than after surface materials cover structural components.
With every preparation item verified, installing asphalt shingles can proceed across a stable base. Roofing crews start shingle placement with confidence because drainage layers, edge protection, structural support, and layout references already meet project requirements.
How to Install Asphalt Shingles
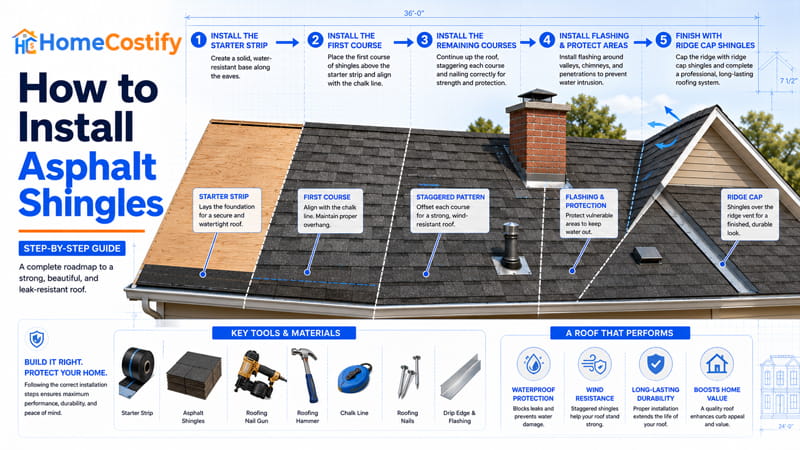
Protective layers now form a stable base for shingle installation. Installing asphalt shingles follows a planned sequence because each course depends on accurate placement beneath it. Skipping or rearranging steps weakens water control and reduces finished roof quality.
Step 1: Install the Starter Strip
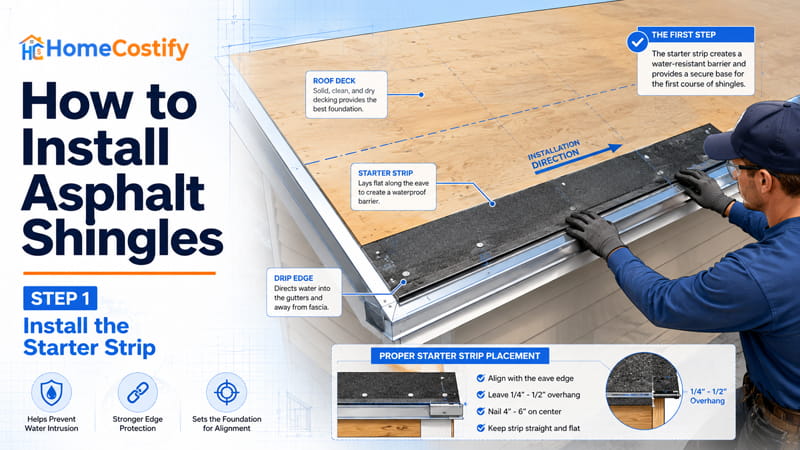
Roof edges receive stronger wind pressure than central roof areas. A starter strip strengthens that vulnerable edge and establishes a straight reference along the eaves before standard shingles enter the installation sequence.
Starter strips differ from field shingles in both purpose and construction. Factory-applied sealant strip placement supports stronger adhesion near roof edges, reducing opportunities for wind to lift exposed tabs. Standard shingles cannot deliver identical edge performance when used as direct substitutes.
Accurate positioning affects much more than appearance. Small alignment errors at this stage continue into later shingle courses, making correction increasingly difficult. Careful placement supports clean roof lines from one end of the eaves to the other.
Successful asphalt shingles installation begins with a straight, secure foundation at roof edges. Wind resistance, edge protection, and long-term alignment all depend on starter strip placement completed with care.
Step 2: Install the First Course
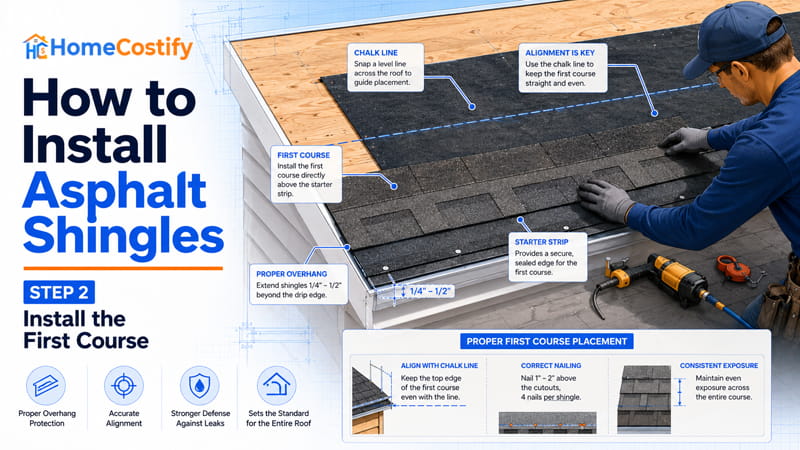
First impressions of a finished roof usually begin with one row of shingles. That opening row establishes visual balance and creates a reference for all remaining courses. Installing asphalt shingles without careful attention here invites cumulative alignment problems farther upslope.
A uniform overhang protects fascia edges and directs runoff toward gutters without leaving excessive shingle exposure beyond roof edges. Consistent spacing above the starter strip preserves clean lines and supports balanced water drainage.
Careful alignment during first course placement limits gradual drift as installation progresses. Even slight variation becomes easier to notice after additional rows cover larger roof areas. Returning to correct early mistakes grows increasingly difficult once surrounding shingles lock into position.
Professional roofers spend extra time checking measurements along this opening course because later rows follow its direction. Accurate placement at this point strengthens both appearance and long-term performance without requiring corrective adjustments farther up the roof.
Step 3: Install the Remaining Shingle Courses
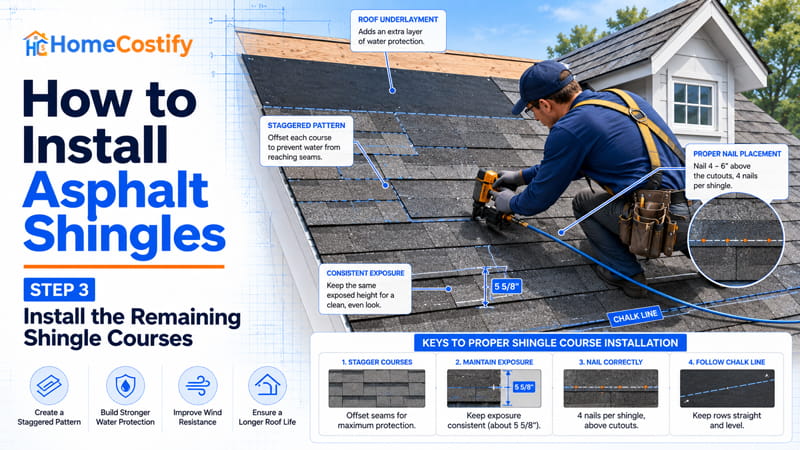
Field shingles gradually cover most visible roof areas. Uniform spacing, accurate fastening, and steady layout preserve both water management and roof appearance from lower courses toward the ridge. Small inconsistencies spread farther with each additional row, making precision valuable throughout this stage.
Maintain the Correct Offset Pattern
Straight vertical joints create continuous pathways that concentrate water movement and weaken surface uniformity. An offset pattern separates adjacent joints, reducing direct alignment between neighboring courses.
A proper stagger pattern distributes water over different sections instead of guiding runoff through repeated joint locations. Offset joints likewise spread structural loads across surrounding shingles, producing a balanced field. Careful spacing strengthens asphalt shingles installation without changing visible roof appearance.
Consistent joint offset supports durable asphalt shingles installation from eaves toward upper roof sections.
Follow Proper Nail Placement
Wind applies lifting force long before shingles show visible movement. Correct nail placement secures each course without damaging surrounding material or reducing holding strength.
Most residential installations use four roofing nails per shingle under standard conditions. High-wind regions commonly require six fasteners, following local regulations and manufacturer specifications. Proper depth matters as much as quantity. Nail heads should sit flush against shingle surfaces without cutting into material or standing above it.
| Roof Condition | Typical Nail Requirement |
|---|---|
| Standard Installation | 4 Nails per Shingle* |
| High-Wind Areas | 6 Nails per Shingle* |
*Always follow local building codes and manufacturer instructions.
A correct nail pattern depends on placement as much as fastener count. Misaligned nails reduce wind resistance even when correct quantities appear in each course. Careful fastening supports installing asphalt shingles under changing weather conditions without unnecessary movement.
Reliable fastening gives installing asphalt shingles a secure attachment from lower courses to upper sections.
Keep Consistent Shingle Exposure
Visible shingle height influences both appearance and drainage. Uniform shingle exposure creates balanced roof lines and preserves intended overlap between neighboring courses.
Reference marks established with each chalk line keep exposure measurements steady as installation progresses. Small differences near lower rows grow easier to notice after additional courses cover larger roof areas. Consistent spacing supports asphalt shingles installation by preserving intended water flow and overlap geometry.
Work Around Roof Features
Large uninterrupted roof sections eventually give way to openings and structural projections. Dormers, skylights, chimneys, and plumbing vents interrupt straight shingle courses, requiring careful fitting around each feature.
Accurate trimming maintains clean edges without forcing shingles into irregular shapes. Careful measuring limits unnecessary gaps around roof penetrations and other roof features, preserving orderly layout before surrounding waterproofing details receive attention. Thoughtful fitting keeps installing asphalt shingles aligned even where roof geometry changes direction.
Step 4: Install Flashing and Protect Vulnerable Areas
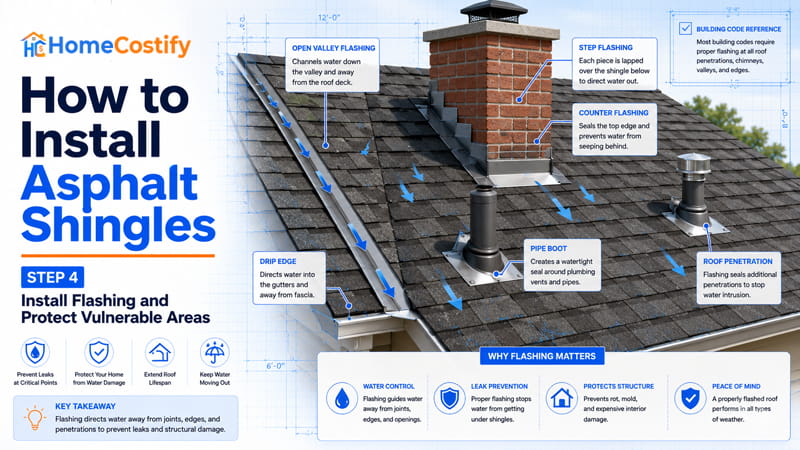
Flat shingle fields rarely develop leaks on their own. Water problems concentrate where roof planes intersect or where building components interrupt continuous roof surfaces. Flashing protects those transition points, preserving uninterrupted drainage throughout asphalt shingles installation.
Protect Roof Valleys
Rain from two roof planes converges inside roof valleys, creating higher water volume than surrounding areas. Valley protection channels concentrated runoff toward lower roof sections and limits moisture intrusion where drainage pressure reaches its highest level.
Flash Around Chimneys
Brick and masonry interrupt continuous roof surfaces with vertical walls. Proper chimney flashing redirects runoff around chimney edges, preventing water from entering joints where horizontal and vertical surfaces meet.
Flash Around Plumbing Vents and Pipe Boots
Vent pipes pass directly through finished roof coverings. A properly fitted pipe boot seals that opening, allowing water to flow around pipe penetrations without reaching structural wood beneath surrounding shingles.
Protect Other Roof Penetrations
Skylights, attic vents, satellite mounts, and similar roof penetration points interrupt normal drainage paths. Each opening requires a smooth water transition so runoff continues toward roof edges without collecting around exposed joints.
Step 5: Finish With Ridge Cap Shingles
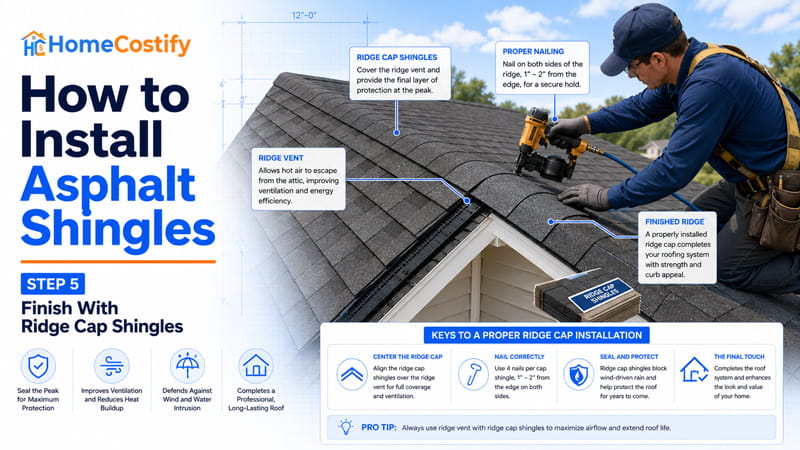
Roof planes finally meet at the ridge, making that line the last area left uncovered. Ridge cap shingles complete roof coverage by sealing joints where opposing shingle courses come together. Their shape differs from field shingles, allowing a cleaner fit along roof peaks.
Homes equipped with a ridge vent require ridge cap shingles that protect ventilation openings without blocking airflow. Air exits through ridge roof ventilation, yet rain still needs a controlled path away from exposed openings. Both components work as part of one roof assembly.
Completing this stage marks the final step of asphalt shingles installation. A careful visual review confirms straight ridge lines, uniform cap alignment, secure attachment, and uninterrupted coverage from one end of the roof peak to the other before the project reaches completion.
Inspect the Finished Asphalt Shingle Installation
Finished work deserves one final evaluation before changing weather puts new roofing to its first real test. A systematic review confirms that visible components follow intended layout, drainage paths, and edge protection without overlooked installation defects.
Check Overall Shingle Alignment
Standing at ground level reveals details that disappear during installation. Straight horizontal lines create a uniform appearance, making small deviations easier to recognize before they spread across larger roof areas. Installing asphalt shingles with accurate alignment produces clean visual lines from eaves toward ridge.
Uniform exposure deserves equal attention during this review. Uneven spacing changes roof appearance and can interrupt intended overlap between neighboring courses. Small variations become much easier to identify once installation reaches completion.
Inspect Flashing and Roof Edges
Water naturally reaches transitions before leaving a roof. Flashing should fit tightly around vulnerable intersections without visible gaps or lifted sections. Valleys deserve close attention because runoff volume increases where two roof planes meet.
Walk around the house and examine eaves, rake edges, and drip edge from different viewing angles. Straight metal edges, secure attachment, and uninterrupted drainage paths indicate sound workmanship. Completing asphalt shingles installation with uniform edge protection reduces opportunities for unwanted water entry.
Look for Common Installation Defects
Visual inspection should extend beyond roof appearance alone. Lifted shingles, exposed nails, uneven courses, damaged shingles, and loose flashing each signal conditions that deserve attention before weather places added stress on finished roofing.
| Inspection Area | What to Check |
|---|---|
| Courses | Straight alignment |
| Flashing | Tight fit |
| Valleys | Proper water path |
| Ridge | Complete coverage |
| Roof Edge | Secure perimeter |
Finished roofs perform as complete assemblies, not isolated parts. Straight courses, sealed transitions, protected valleys, continuous ridge coverage, and secure roof edges all contribute to dependable water management once rain and wind reach the structure.
Common Asphalt Shingle Installation Mistakes
Roof leaks do not always originate from defective materials. Small installation errors can interrupt drainage, weaken wind resistance, or shorten asphalt shingles lifespan. Recognizing those causes gives homeowners a clearer basis for evaluating completed workmanship.
Incorrect Nail Placement
Wind places constant stress on shingle fasteners throughout changing seasons. Incorrect nail placement leaves shingles vulnerable to movement, lifting, or tearing during strong gusts. Fasteners driven too high, too low, too deep, or left proud of the shingle surface reduce holding strength. Problems created during installing asphalt shingles sometimes stay hidden until severe weather exposes weak attachment.
Poor Underlayment Installation
Continuous underlayment coverage forms a secondary moisture barrier beneath finished shingles. Gaps, wrinkles, torn sections, or inadequate overlap interrupt intended drainage paths below exterior roof covering. Moisture reaching exposed wood can stay unnoticed for long periods before visible staining or structural deterioration appears.
Improper Flashing Details
Most roof leaks develop around transitions instead of open roof fields. Poorly fitted flashing leaves vulnerable joints around valleys, chimneys, vents, or wall intersections exposed to repeated water entry. Small gaps may appear insignificant after installation, yet repeated rainfall gradually enlarges hidden moisture damage inside surrounding roof assemblies.
Ignoring Weather Conditions
Material behavior changes under different temperatures and site conditions. Excessive heat softens shingles during handling, freezing temperatures delay sealant activation, and rain interrupts bonding between roofing components. Prolonged weather exposure during installation increases opportunities for moisture intrusion before roof coverings reach full protection.
Minor installation errors can gradually develop into larger problems that influence long-term durability and eventually contribute to asphalt shingles repairs cost, even when roofing materials themselves remain in good condition.
Should You Install Asphalt Shingles Yourself?
Roof replacement projects vary widely in difficulty. Success depends on roof shape, working experience at height, physical ability, and confidence handling critical waterproofing details under real jobsite conditions.
When DIY Installation Makes Sense
A low-pitch roof with a simple roof design presents fewer challenges than structures filled with valleys, dormers, or intersecting roof lines. Homeowners who already understand ladder safety, measurement accuracy, and basic construction practices sometimes complete straightforward projects successfully.
Interest in reducing asphalt shingles installation cost motivates many DIY projects. Labor savings alone should not determine that decision. Roof geometry, physical demands, available time, and personal experience deserve equal consideration before beginning asphalt shingles installation. Steeper roof slope angles increase both workload and safety risks, even on relatively small homes.
When Hiring a Professional Is the Better Choice
Steep roofs, multiple dormers, skylights, chimneys, and numerous roof penetrations introduce details that demand precise execution. A complex roof leaves far less room for error because water follows numerous transitions before reaching gutters.
Experienced roofers handle changing roof geometry, material layout, and difficult working conditions as part of daily practice. Even best asphalt shingles cannot deliver expected performance if critical installation details fall outside manufacturer requirements. Installing asphalt shingles on complicated roof designs calls for technical skill that extends beyond placing shingles in straight rows.
Conclusion
A durable roof depends on much more than quality shingles. How to install asphalt shingles follows a sequence that prepares structural wood, manages water beneath finished roof covering, and seals vulnerable transitions before reaching ridge. Precision during layout, fastening, waterproofing, and edge protection shapes long-term performance.
Each component contributes to one drainage system, directing rain away from framing and limiting moisture intrusion under changing weather conditions. Strong results come from disciplined workmanship, accurate installation order, and full compatibility between all parts of the roof assembly.
FAQs About How to Install Asphalt Shingles
How to properly install asphalt shingles?
Prepare a sound roof deck, install protective layers, place starter strip, lay field shingles in sequence, protect vulnerable areas with flashing, and finish with ridge cap according to manufacturer instructions.
What do you put under asphalt shingles?
Asphalt shingles sit above underlayment, which serves as secondary moisture protection. Ice and water shield covers vulnerable locations where building codes or roof conditions require additional protection.
What is the most commonly used underlayment for asphalt shingles?
Synthetic underlayment has become a common choice because of its strength and lighter weight. Asphalt felt still appears on numerous residential roofing projects.
What slope do you need for asphalt shingles?
Asphalt shingles require a minimum roof slope. Lower slopes can require additional protective measures. Always follow local building codes and manufacturer instructions.
What is the best way to glue down asphalt shingles?
Asphalt shingles are not secured primarily with adhesive. Holding strength comes from factory-applied sealant strips and correctly installed fasteners following manufacturer specifications.
Synthetic underlayment has become a common choice because of its strength and lighter weight. Asphalt felt still appears on numerous residential roofing projects.