The roof still looks complete from the yard, even though the old shingles are about to come off. How to install architectural shingles starts with marks and measurements that disappear once new courses cover them. Homeowners getting ready to install architectural shingles seldom expect a line drawn near the eaves to stay with the project all the way to the ridge. A gap no wider than a pencil can keep returning from row to row.
Fresh rows begin at the eaves and continue upward. A completed course quickly turns into the reference for the next. By late afternoon, the work has reached the upper slope, leaving the ridge as the final stretch still waiting to be covered.
Hours later, the house presents a clean pattern from the street. Parallel courses stretch from the eaves to the ridge without drawing attention to the work underneath.
Everything needed for a good result happens before the first bundle leaves the driveway. The next step begins with deciding whether conditions are right to start the project.
Before You Install Architectural Shingles
A roofing project can appear ready from the ground without meeting the conditions needed for a safe start. How to install architectural shingles begins with careful planning, realistic expectations, and a close assessment of the house while everything is still on the ground.
Who Should (and Shouldn’t) Install Architectural Shingles
Standing in the yard gives a clear view of what lies overhead. Wide, open roof sections call for a different level of experience than steep slopes filled with valleys and dormers. Experience should match the job ahead.
Ask yourself a few practical questions.
- Is the roof a simple gable, or does it include valleys, dormers, skylights, or intersecting roof lines?
- Does the roof slope feel manageable for hours of steady work?
- Can a ladder stand on solid, level ground with enough space to carry shingles safely?
- Have you completed roofing projects with a similar level of difficulty?
Several positive answers point toward a realistic DIY effort. Uncertainty in more than one area deserves careful thought. A final decision can wait until every answer feels clear.
Safe access deserves equal attention. A narrow side yard, limited ladder placement, or repeated lifting can drain time and energy long before the day is over. Tall homes, complex roof layouts, restricted access, or visible structural concerns are strong signals that hiring a professional roofer is the safer choice.
Choose the Right Weather and Roof Conditions
Stable weather creates a full working day without long interruption time, reducing the chance of leaving open sections exposed when conditions change. A quick forecast check carries as much weight as the view outside the front door.
Loose shingles, soft decking, scattered debris, moss, or standing moisture can all signal work that belongs ahead of a new roofing project. A slow walk around the house can reveal uneven lines, damaged edges, or worn areas that deserve a closer inspection after safe access is in place.
A favorable forecast means little when visible damage still needs attention. Clear weather and a sound structure belong in the picture at the same time. Once both are in place, planning gives way to preparation.
Understand the Components Beneath Architectural Shingles
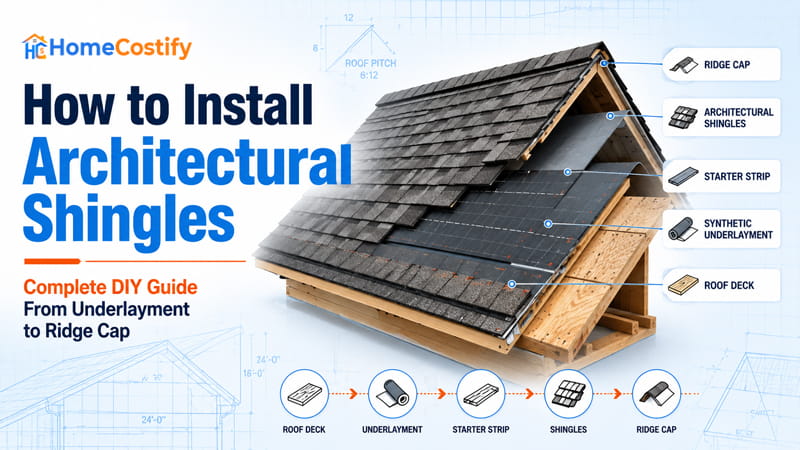
A finished roof hides far more than the shingles visible from the street. Cutting through it reveals a stack of roof materials extending from the roof deck to the ridge, with each component occupying a fixed position beneath the exposed surface. Architectural shingles installation follows this order, even though most of those materials disappear once the house is viewed from the outside.
| Layer | Primary Purpose | Installed Before |
|---|---|---|
| Roof Deck | Structural base | Everything |
| Drip Edge | Protects roof edges | Underlayment or over it depending on location |
| Ice and Water Shield | Additional waterproofing | Synthetic underlayment |
| Synthetic Underlayment | Secondary moisture barrier | Starter strip |
| Starter Strip | Supports the first shingle course | Architectural shingles |
| Architectural Shingles | Primary weather protection | Ridge cap shingles |
| Ridge Cap Shingles | Protects the roof peak | Final layer |
According to the National Roofing Contractors Association (NRCA), asphalt shingle performance depends on the roofing system as a whole rather than the surface covering alone. The roof deck, underlayment, flashing, ventilation, and shingles manage water, resist weather exposure, and support long-term roof durability as parts of one roofing system.
The cross-section below introduces where each component belongs and how the layers build from the structural base to the roof peak without stepping into architectural shingles installation techniques.
Roof Deck
The lowest structural layer supports everything placed above it. Roof sheathing forms a continuous base beneath the waterproofing materials and exposed shingles, carrying the load from the eaves to the ridge. Once the upper architectural shingles materials are in place, this foundation disappears from sight.
Drip edge follows the perimeter, waterproofing membranes protect vulnerable areas, synthetic underlayment spans the roof field, and the exposed shingles complete the outer surface. Every remaining component rests on this base from beginning to end.
Drip Edge
Running along the eaves and rakes, this metal edging forms the outer boundary where the roofing layers meet the edge of the house. Its location defines the perimeter before the remaining materials continue inward across the roof field.
Waterproofing membranes, synthetic underlayment, starter strip, and architectural shingles all extend from this edge. Although narrow, it stays part of the roofing system from the first structural layer to the completed surface.
Ice and Water Shield
Placed over vulnerable sections of the roof deck, this waterproofing membrane protects areas where water has a greater chance of collecting or backing up. Eaves, valleys, roof penetrations, and similar locations commonly receive this added protection instead of full roof coverage.
Synthetic underlayment continues beyond those areas, covering the broader roof field with a continuous moisture barrier. Both materials appear beneath the exposed shingles while serving different parts of the roof.
Synthetic Roof Underlayment
Covering the roof deck from eaves to ridge, this continuous sheet separates the structural base from the exposed roofing materials. Ice and water shield protects selected locations, whereas synthetic underlayment spreads across the remaining roof field to maintain uninterrupted coverage.
Starter strip and architectural shingles cover this sheet once installation reaches the upper layers. From that point forward, it stays concealed beneath the completed roof while continuing across the roof field.
Starter Strip
Positioned along the eaves, this narrow strip sits beneath the first course of architectural shingles. It separates the moisture-control layers from the shingle courses above, marking the point where the exposed roof covering begins.
The first course starts here, with every remaining course continuing toward the ridge. Once the surrounding shingles are in place, the strip disappears beneath them.
Architectural Shingles
These shingle courses define the roof through their profile, texture, and color. Every supporting material stays beneath them, leaving this outer covering as the part seen from the street. Actual architectural shingle dimensions vary by manufacturer, making product specifications the proper reference instead of assuming every product follows identical measurements.
Starter strip supports the first course, and ridge cap shingles close the roof at its highest point. Anyone preparing to install architectural shingles should recognize how those courses relate to the supporting layers underneath.
Ridge Cap Shingles
Placed along the ridge where opposing roof slopes meet, these shingles cover the highest exposed section of the roof. The courses from each side stop beneath this point, leaving the ridge caps to close the opening at the peak.
Viewed as a cross-section, the structure now extends from the roof deck to the ridge in a continuous order. Every layer occupies a defined position beneath the completed roof, providing the full picture needed before installing architectural shingles.
Prepare for Architectural Shingle Installation
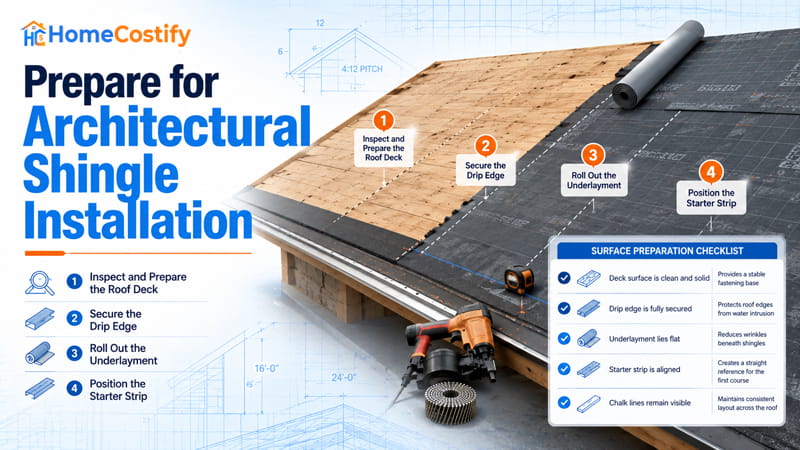
Stepping onto the roof changes the focus from planning to preparation. Install architectural shingles only after the working surface, roof edges, waterproof covering, and starter strip are fully prepared.
| Task | Why Verify It Before Continuing |
|---|---|
| Deck surface is clean and solid | Provides a stable fastening base |
| Drip edge is fully secured | Protects roof edges from water intrusion |
| Underlayment lies flat | Reduces wrinkles beneath shingles |
| Starter strip is aligned | Creates a straight reference for the first course |
| Chalk lines remain visible | Maintains consistent layout across the roof |
A roof can appear straight from a few feet away while small irregularities remain underfoot. A raised fastener, loose joint, or wrinkle in the underlayment might seem insignificant at first. After the first courses cover those areas, correcting them takes considerably more effort than fixing them during preparation.
Inspect and Prepare the Roof Deck
Every step begins with the surface beneath your feet. Walk the deck slowly, checking for loose fasteners, uneven joints, damaged sheathing, or debris left behind from the previous roof. Even small scraps can lift the underlayment or interrupt a straight layout once the work begins.
Sweep away dust, remove loose material, and drive raised fasteners flush with the deck. A clean surface gives every remaining task a solid starting point and leaves nothing that could interfere with the layers added afterward.
Secure the Drip Edge
Move to the roof perimeter after the deck is clean. Each section should sit straight along the eaves and rakes without loose sections, bent edges, or visible gaps. Small alignment changes near the perimeter can continue through the first rows of shingles.
Check every joint before moving forward. Straight edges create a dependable reference once chalk lines and the starter strip are in place.
Roll Out the Underlayment
Unroll each sheet across the deck with enough time to smooth wrinkles and remove trapped air. The surface should lie flat without waves, folds, or lifted corners that could telegraph through the shingles later.
Overlap each run according to the manufacturer’s specifications and keep every sheet aligned from one section to the next. Installing architectural shingles starts on a surface that already looks orderly, even before the first course reaches the roof.
Position the Starter Strip
The final preparation step focuses on alignment. Position the starter strip against the chalk line and compare both from one end of the roof to the other before fastening anything permanently. A slight adjustment at this stage takes only moments and can prevent repeated corrections higher on the roof.
Stand back for one last view across the eaves. Chalk lines remain clear, the starter strip follows a straight path, and the surface is ready for the first course of architectural shingles installation.
How to Install Architectural Shingles Step by Step
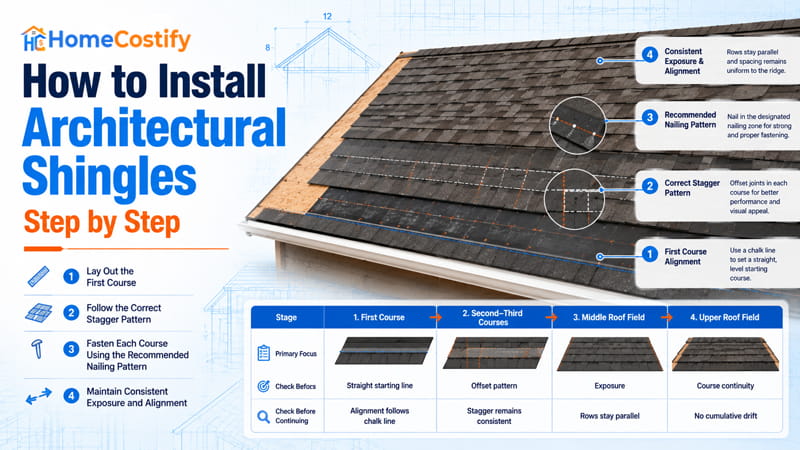
The roof is finally ready for shingles. How to install architectural shingles comes down to maintaining straight lines, steady spacing, and careful fastening from the first course until the main roof field is covered.
| Stage | Primary Focus | Check Before Continuing |
|---|---|---|
| First course | Straight starting line | Alignment follows chalk line |
| Second–Third courses | Offset pattern | Stagger remains consistent |
| Middle roof field | Exposure | Rows stay parallel |
| Upper roof field | Course continuity | No cumulative drift |
Small errors rarely attract attention during the opening rows. Three or four completed courses can reveal a slight drift that never stood out from arm’s length. A short pause to check the layout from below usually takes less time than removing shingles after the pattern has moved farther up the roof.
Lay Out the First Course
The first full course sets the reference for everything that follows across the roof field. Place each shingle against the starter strip and keep the lower edge aligned with the chalk line from one end of the roof to the other. Short gaps or uneven spacing deserve attention before another shingle covers them.
Step back after placing a few shingles instead of waiting until the row reaches the opposite end. Minor movement becomes easier to spot from a short distance than while working a few inches above the surface. A slight correction at this point keeps the remaining row on line without disturbing the surrounding shingles.
Complete the first course before moving upward. A straight starting line gives the second row a dependable reference, leaving the roof field ready for the stagger pattern.
Follow the Correct Stagger Pattern
The second course changes the rhythm of the installation. Joints that lined up in the first row now move sideways, creating the offset pattern carried through the remaining roof field. Follow the offset recommended by the shingle manufacturer and keep that spacing unchanged from one course to the next.
New rows build quickly after the pattern is established. A repeated joint can slip into place without drawing attention when the work stays close to your hands. Looking back across three or four completed courses reveals those repeated joints long before they spread across a larger section of the roof.
Pause for a quick visual check every few rows instead of waiting until the upper roof field is nearly covered. A small adjustment made early blends into the surrounding pattern without opening a large section of finished work. That steady rhythm carries the layout toward the upper portion of the roof with fewer visible interruptions.
Why Offset Consistency Matters
Offset spacing influences the appearance of the roof long before the last course reaches the upper field. Repeating joints create noticeable vertical lines that interrupt the laminated shingle pattern, even when every course follows the correct exposure. A consistent offset keeps the finished roof looking balanced from the yard as additional rows continue upward.
Fasten Each Course Using the Recommended Nailing Pattern
Each shingle includes a designated nail line that serves as the fastening reference for the course. Place roofing nails where the manufacturer specifies, keeping every fastener straight and driven to the proper depth. A consistent nailing pattern keeps each course seated without pulling the shingle out of position.
Check the seal strip before driving the next group of nails. Fasteners placed too high or too low can miss the intended nailing zone, leaving the following course without the support expected by the manufacturer. Matching the recommended pattern across every row produces a cleaner result than changing nail placement from course to course.
Take a brief look across the completed rows before continuing. Nail heads should sit flush against the shingle surface without cutting into the material or standing proud above it. Small differences become much easier to spot while only a few courses are in place.
Avoid Common Nail Placement Errors
Three mistakes appear more than any others during installation: overdriven nails, underdriven nails, and angled nails. An overdriven nail cuts into the shingle surface, an underdriven nail leaves the head raised, and an angled nail prevents the shingle from sitting flat. Keeping every fastener straight and evenly seated produces a cleaner roof field as the remaining courses continue upward.
Maintain Consistent Exposure and Alignment
Exposure stays consistent when every new course follows the reveal specified by the manufacturer. Measure that distance frequently instead of relying on sight alone, especially after covering a larger section of the roof field. Small differences can spread across multiple rows before they become noticeable from a standing position.
Compare the shingle edges with those reference lines every few rows and pause to view the roof from a different angle. Looking down the completed courses or checking the pattern from the ground can reveal slight movement that disappears during close-up work.
A minor correction requires very little effort when it appears within the latest rows. Waiting until the upper roof field is nearly covered can turn a simple adjustment into a much larger task. Short inspection breaks between groups of completed courses keep the layout steady without slowing the overall pace.
The final open section of the roof field gradually disappears as the remaining courses reach the upper portion of the slope. The main roofing surface is now complete, leaving only flashing details and the ridge for the next stage of architectural shingles installation.
Complete the Architectural Shingle Installation
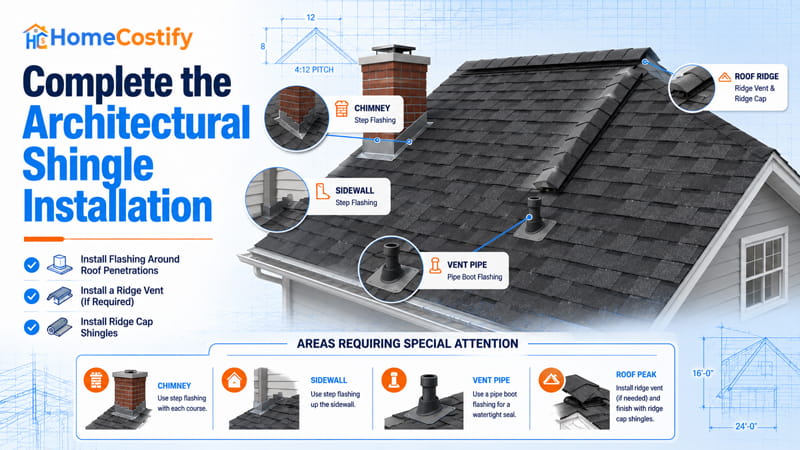
The main roof field is now covered, but the remaining areas require a different technique. Architectural shingles installation enters its final stage where chimneys, vent pipes, roof edges, and the ridge must guide water safely away from the roofing system.
| Roof Area | Component |
|---|---|
| Chimney | Step flashing |
| Sidewall | Step flashing |
| Vent pipe | Pipe boot flashing |
| Roof peak | Ridge vent and ridge cap |
Water follows every change in direction across a roof. Flat roof sections depend on overlapping shingles, while penetrations and roof intersections rely on flashing shaped to match each opening. The final stage shifts from covering broad surfaces to sealing the points where water can change direction.
Install Flashing Around Roof Penetrations
Roof penetrations interrupt the continuous shingle pattern, making them the first areas to finish after the roof field is complete. Chimneys, sidewalls, and vent pipes each require flashing shaped for that specific location instead of relying on standard shingle courses.
Step Flashing
Step flashing fits where a sloped roof meets a vertical surface such as a chimney or sidewall. Each metal piece overlaps the next, directing water downward instead of allowing it to follow the joint between the wall and the roof. This arrangement continues until the full intersection is protected.
Pipe Boots and Vent Flashing
Plumbing vents pass through the roof surface, creating circular openings that require a different flashing profile. A pipe boot surrounds the vent, fitting beneath the upper shingles and over the lower courses to maintain uninterrupted water flow around the penetration. Homeowners preparing to install architectural shingles should match each flashing profile to the penetration it protects rather than treating every opening the same.
Install a Ridge Vent (If Required)
Some roofing systems include a ridge vent as part of the ventilation design. Positioned along the roof peak, it allows warm air from the attic to escape while leaving space for the ridge cap above. The vent should run continuously along the designated section before the roof reaches its final covering.
Install Ridge Cap Shingles
Ridge cap shingles complete the highest point of the roof after the field shingles, flashing, and ridge vent are in place. Each cap overlaps the previous piece, following the direction recommended by the manufacturer until the ridge is fully covered.
Viewed from the yard, the individual work performed across the roof now blends into a single finished surface. Every penetration has its matching flashing, the ridge is fully covered, and installing architectural shingles reaches its final construction stage before the roof moves on to inspection.
Inspect Your Architectural Shingle Installation
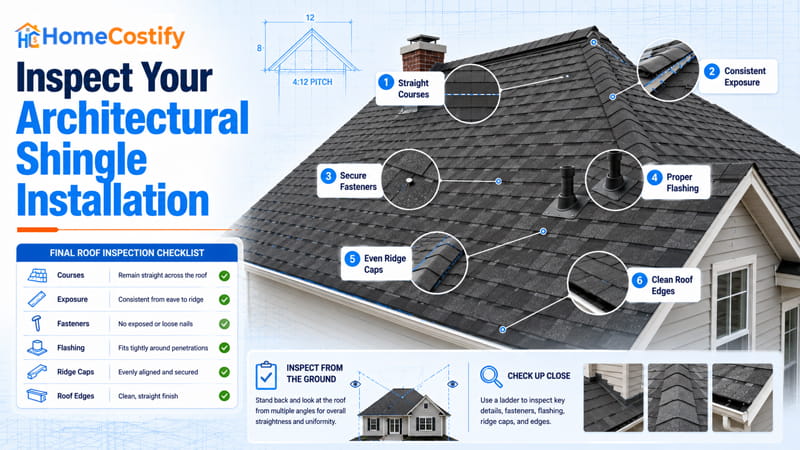
The roof now appears complete from the yard, although appearance alone cannot confirm that every detail meets the standard expected from architectural shingles installation. A careful inspection checks the finished surface, transitions, and roof edges before the project is considered ready for service.
| Inspection Item | What to Verify |
|---|---|
| Courses | Remain straight across the roof |
| Exposure | Consistent from eave to ridge |
| Fasteners | No exposed or loose nails |
| Flashing | Fits tightly around penetrations |
| Ridge Caps | Evenly aligned and securely fastened |
| Roof Edges | Clean, straight finish |
Industry guidance from the National Roofing Contractors Association (NRCA) and the Asphalt Roofing Manufacturers Association (ARMA) emphasizes evaluating the completed roofing assembly as a system. Straight shingle courses, properly integrated flashing, secure ridge caps, and consistent fastening all contribute to long-term weather performance rather than any single component alone.
Inspect the Roof from the Ground
Begin where the entire roof can be seen at once. Stand far enough away to view both roof planes without looking straight upward. Crooked courses, uneven exposure, or slight drift near the ridge usually stand out from this distance long before they become obvious at close range.
Follow the roof edges with your eyes from one end to the other. The eaves should form a clean line, ridge caps should appear evenly spaced, and the completed surface should present a uniform pattern without unexpected changes in alignment.
Check Critical Details Up Close
Move closer after the overall layout looks correct. Examine flashing around chimneys, sidewalls, and plumbing vents for tight transitions without open gaps or lifted sections. Check the ridge caps for secure placement and confirm that no roofing nails remain exposed on the finished surface.
Seal strips should lie flat where they can be seen, and cut edges should appear clean without damaged corners or loose pieces. Anyone installing architectural shingles should finish the project with this close inspection instead of leaving the roof as soon as the final shingle is fastened.
Confirm the Entire Roofing System
Walk through the completed work one final time before removing ladders and equipment. Compare the finished roof with the inspection checklist and confirm that every visible detail matches the intended layout from the eaves to the ridge.
Once those checks are complete, the project moves beyond construction and into service. The house now has a completed roofing system, and homeowners who install architectural shingles can leave the site knowing the roof has passed a practical final inspection.
Common Architectural Shingle Installation Mistakes
A newly finished roof can appear flawless from the ground while small installation errors are already taking shape. Most problems begin with details that seem minor during the project but become easier to notice after the roof is viewed as a complete surface.
| Mistake | Possible Result |
|---|---|
| Crooked first course | Visible alignment drift |
| Incorrect exposure | Uneven appearance |
| Improper nailing | Reduced wind resistance |
| Poor flashing integration | Higher leak risk |
Alignment and Layout Errors
Straight courses should read as one continuous pattern from the eaves toward the ridge. A slight drift near the starting rows can carry upward until the finished roof develops uneven lines that stand out from the yard. Exposure deserves equal attention because small differences in row height become much easier to notice after larger sections of the roof are complete.
Repeated joints can interrupt the laminated shingle pattern even when the architectural shingles colors and profile remain consistent. A short visual check every few completed rows gives those irregularities a chance to stand out before they spread across the roof field.
Fastening and Flashing Problems
Problems are not always limited to the shingle surface. Exposed fasteners, raised nail heads, lifted flashing edges, or loose transitions around chimneys and vent pipes can interrupt the path water follows across the roof. Those details deserve the same attention as straight courses because they influence how the completed roof performs during changing weather.
Flashing should sit tightly against each penetration without open gaps or distorted edges. A clean transition around every opening leaves water with a clear path instead of creating places where moisture can collect.
Catch Problems Before They Grow
The final inspection offers the best opportunity to spot small concerns while every part of the project is still easy to examine. Walking around the house, viewing the roof from different angles, and checking key details up close can reveal issues that remain hidden during installation.
Small observations made early can prevent larger consequences later. Allowing visible alignment problems, exposed fasteners, or flashing gaps to remain in place can eventually contribute to repairs associated with higher architectural shingle repair cost, even though the roof looked complete when the project ended.
Should You Install Architectural Shingles Yourself?
Completing the installation answers one question and raises another. The focus now shifts from the installation sequence to whether the project truly matches the roof, the available time, and the experience required to deliver a dependable result.
| Situation | DIY | Professional |
|---|---|---|
| Simple roof layout | ✓ | |
| Multiple valleys and dormers | ✓ | |
| Steep roof pitch | ✓ | |
| Limited roofing experience | ✓ | |
| Adequate safety equipment | ✓ |
When DIY Makes Sense
DIY installation fits projects with uncomplicated roof layouts, comfortable working heights, and enough uninterrupted time to finish the work without rushing. Wide roof planes, limited penetrations, and clear ladder access create conditions that are easier to manage than roofs filled with intersecting sections or steep transitions.
Previous roofing experience also changes the equation. Homeowners who have completed similar projects understand how quickly small layout changes become visible after additional courses are installed. Architectural shingles cost deserves consideration, although material savings alone rarely determine whether completing the work yourself is the right decision.
When Hiring a Professional Is the Better Choice
Complex roofs demand a different level of planning and execution. Multiple valleys, dormers, skylights, tall roof lines, restricted access, and steep slopes all increase the difficulty long before the first bundle reaches the roof. Those conditions leave less room for small errors and require steady progress from start to finish.
Material quality cannot replace skilled workmanship. Even the best architectural shingles perform as intended only when every part of the installation follows the manufacturer’s specifications. When roof complexity exceeds your experience or comfort level, hiring a qualified roofing contractor becomes the stronger choice for the project.
How to Make Your Architectural Shingle Installation Last
A finished roof begins its longest stage after the last shingle is secured. Long-term performance depends on how the completed system responds to weather, temperature changes, and routine observation during the years ahead.
| Factor | Long-Term Influence |
|---|---|
| Proper installation | Supports consistent performance |
| Ventilation | Regulates attic temperature and moisture |
| Water drainage | Directs water away from the roof surface |
| Periodic inspection | Identifies developing problems early |
Environmental Factors That Influence Roof Performance
Rain, wind, sunlight, and seasonal temperature changes place constant demands on every roof. A well-installed system manages those conditions far better than one with small installation defects hidden beneath the finished surface. Clear drainage paths, balanced attic ventilation, and secure roofing components all contribute to steady long-term performance.
Surrounding conditions matter as well. Trees that drop heavy debris, branches rubbing against the roof, or standing water caused by blocked gutters can shorten architectural shingles lifespan even when the installation meets manufacturer recommendations. Watching those conditions over time gives homeowners an opportunity to notice gradual changes before they become significant.
Protect the Value of a Well-Installed Roof
A completed roofing project still benefits from occasional observation. Walking around the house after severe storms, checking the roof from the ground, and paying attention to loose shingles, lifted flashing, or blocked drainage paths provide a practical picture of how the system continues to perform without turning inspection into a maintenance routine.
Protecting the roof also protects the investment made during installation. Extending service life can delay the need to budget for architectural shingle replacement cost, allowing homeowners to gain the full value expected from a properly installed roofing system.
Conclusion
Every stage of the project influences the finished roof, from the first planning decisions to the final inspection after installation. Learning how to install architectural shingles means following a sequence where careful preparation, accurate layout, steady workmanship, and consistent verification all carry equal weight throughout the project.
No single component determines the final result on its own. Straight courses, well-integrated flashing, secure ridge caps, and careful inspection all contribute to a roof that performs as intended under changing weather conditions.
A successful installation comes from treating every stage with the same level of care, leaving the completed roof ready to protect the home for years ahead.
FAQs About How to Install Architectural Shingles
How should architectural shingles be installed?
Install architectural shingles over a properly prepared roofing system, beginning with a starter strip and following the manufacturer’s layout, exposure, and nailing requirements across every course.
How do you stagger architectural shingles?
Stagger each course so vertical joints do not align. A consistent offset pattern creates an even appearance and distributes joints across the roof field.
How many layers of architectural shingles can you put on a roof?
Building codes and manufacturers commonly limit roof coverings to two layers, although requirements vary with local regulations and the condition of the existing roof.
Do you need a starting row for architectural shingles?
Yes. A starter strip forms the first sealed edge, supports the initial course, and protects the roof perimeter before the remaining shingles are installed.
What is the pattern for architectural shingles?
Architectural shingles follow a staggered layout with consistent exposure, creating evenly spaced joints and a uniform appearance across the completed roof.